Followers

Monday 19 December 2011

When Love Came Down...

I spent yesterday in a rather reflective and religious mode of mind. It started with watching (and helping) the childrens Nativity service at Church. Emma was a rather uncooperative angel and Jack a very excitable shepherd.


Em and Miss T were completely focussed on making sure that the Baby Jesus was ok:

Jack took his acting role very seriously:

After church, we headed into the City with my mum and dad, where a local church were taking part in a 'Get in the Picture' event. This event always makes me smile as I have photos of Jack dressed as a Shepherd here at the same point that I was in labour with Emma. It's cute to think that he was looking at a baby Jesus as his own new baby was being born.


Anyway, we had much fun and laughter as we all decided on our costumes and dressed up. Emma continued to be uncooperative until she saw mummy as an angel and then she wanted in too- she always wants to be like Mummy!


Hopefully, I'll be back tomorrow with the first of my December Daily posts. Better late than never, huh?

Friday 25 November 2011

Cath Kidston Bunting

About a month ago, I was at a charity sale where they had some samples of Cath Kidston material for sale at only 10p a piece. Not one to resist a bargain especially when I a) love CK b)like making things and c) have a daughter who has lots of flowery, girly prints in her room, I had a buy a pile of them!

One of the first things I wanted to make was a string of bunting flags for Emmas room. The very same girl was poorly this week, so whilst I was off work with her, I decided to use her nap times to make a start on this project:


These were the material rectangles that I started with:

1. I folded each rectangle in half lengthways, and ruled a line almost corner to corner. I knew I was going to sew a hem on each triangle hence I didn't go fully corner to corner. Once the hem was stitched it would be a true triangle.


2. These are my piles of 'triangles'. I did 15 (3 triangles x 5 designs).


3. This is what one triangle looks like when unfolded.


4. I then pinned a hem on all the flags into the triangle shape


Reverse:

5. I then tacked each flag before sewing them neatly along each tacked edge using my sewing machine.

6. Once I had sewn all the flags, I unrolled the tape I was using to hold the flags. Mine was 2m long and cost about £2-3 from John Lewis. With the tape on the floor, I played around with the placement of the flags. I decided that 9 flags was about right with a 2m length. I found the middle of the tape and placed the middle flag in that position. Working out to either side, I placed the other flags on the tape leaving a 2 inch gap between each flag. I finished with a longer length of tape at the ends to allow for knotting/hanging.


7. Happy with my flag placement, I pinned the flags in place before sewing them properly.


I'm very, very happy with the finished result!


Monday 14 November 2011

Home organiser file

I'm feeling rather proud of this little project. I quite often get ideas of things to make, get all the products ready, start it and then discover it lying half finished at the back of the cupboard months later! But not this little project. Thought of, designed and made in less than 24 hours and using mostly things I already had handy! Aren't you proud of me?!

I saw a little journal organiser album in Paperchase on Friday (similar to this but a bit more retro) and could see loads of uses for it in my house given that I ALWAYS have a hotspot of paperwork that looks like this in my kitchen: I knew I could use some old October Afternoon retro stash and some paper infills that I had left over from my Week In The Life project so I simply bought an A5 kraft ringbound album for £3 and some ruled paper which came with 5 plain pocket folders for about £3 too. Instantly cheaper than buying a pre made album!
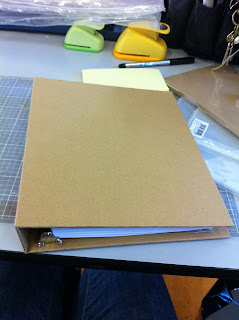

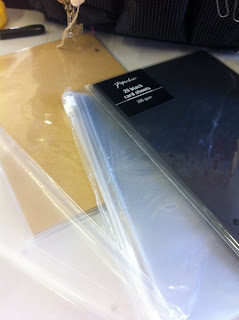
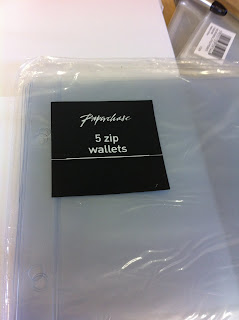


A couple of hours later I've ended up with this useful album:


I started by misting each of the pocket pages using some Mr Hueys in Piglet, Orchard and a green that I can't remember the name of. These were to co-ordinate with the OA papers. I also used some masks on some pages.

I added paper at the bottom of each pocket page and some borders or border stickers, some simple embellishments and a title for each section. I used a 1.5" circle punch to make some tabbed dividers. I divided mine into 5 sections each with a pocket page, lined paper and a zip pocket and then I've added some 4x6 divided pages at the back of the album.


My sections were:

1) To do lists (I think this could be a big section!)


2) Contact list/addresses:


3) Shopping (Handy for writing shopping lists, storing reciepts and, at the moment, all those coupons supermarkets keep sending me!)


4) Activities (think this will end up with memos etc for preschool & nursery mainly)


5) This is a misc. section for anything else I decide I need later:

I'm already loving having this on my side instead of the ugly pile of mail and it was so simple and quick to do.

Sunday 13 November 2011

Sarahs Cards Retreat: The class Layouts

I thought I'd do a quick post about some of the classes we took at the Sarahs Cards Retreat last week. I really loved all the classes and thought there was something for everyone- the DT really did do a good job. Overall, there were 6 classes although I didn't actually photograph every LO so this is just a snapshot (plus these need journalling adding too but I haven't had time yet!)

This was a class I altered to suit a landscape photo although really I should have used a 4x4 pic- love all that bunting though and those pretty flowers!

You can never go wrong with a bit of misting...


Or some Crate Paper (my favourite manufacturer at the moment!)


This was the 'Marmite class' (you either loved it or hated it!)- lots of texture and plenty of glue. Not my favourite class of the retreat but lovely papers and pins and lots of different ideas to think about- possibly the class I learnt the most in?


Anothe LO with a landscape pic rather than the recommended portrait photo but it still works. There's room for journalling to hide in the envelope.


I'll try to blog the challenge canvas that I made tomorrow.

T4L

Saturday 12 November 2011

Sarahs Cards Retreat

After talking to fellow scrappers this weekend about our group retreat last week, I figured it was probably time I actually blogged about it!

For people who don't recognise these two lovely ladies, they are Lianne and Sarah who own and run the fabby Sarahscardsltd and were hosting this event. This is their fab and very friendly Design Team who were helping them with classes etc:


The main cropping room was open 24/7 and was plenty big enough for all of us plus the sizeable shop (more about that later!)


This is Mel and I looking busy whilst 'getting on scrap on!'

As a scrapper who looks to spread out, by midnight I was scrapping on the floor. Gotta love me some misting too!


This was the 'Posh Scrappers Ladies On Tour' in the midst of a class. Quite crowded in the classrooms but as you were only in there for a short time, it was survivable.


Some of the Sarahs Cards shop. I only spent a small fortune in here. Honest.

There's some serious scrumminess to be found in there though!

More of the shop:


I really can't believe it was a week ago that we were there as the weekend went so fast and it seems like such a long time ago. I really enjoyed it though and hope that I'm lucky enough to be able to afford to go again soon!


I'll try and post some pics of LOs from the classes soon.